 Uncorked Conversations
Introduction to Homemade Natural Wine Vinegar
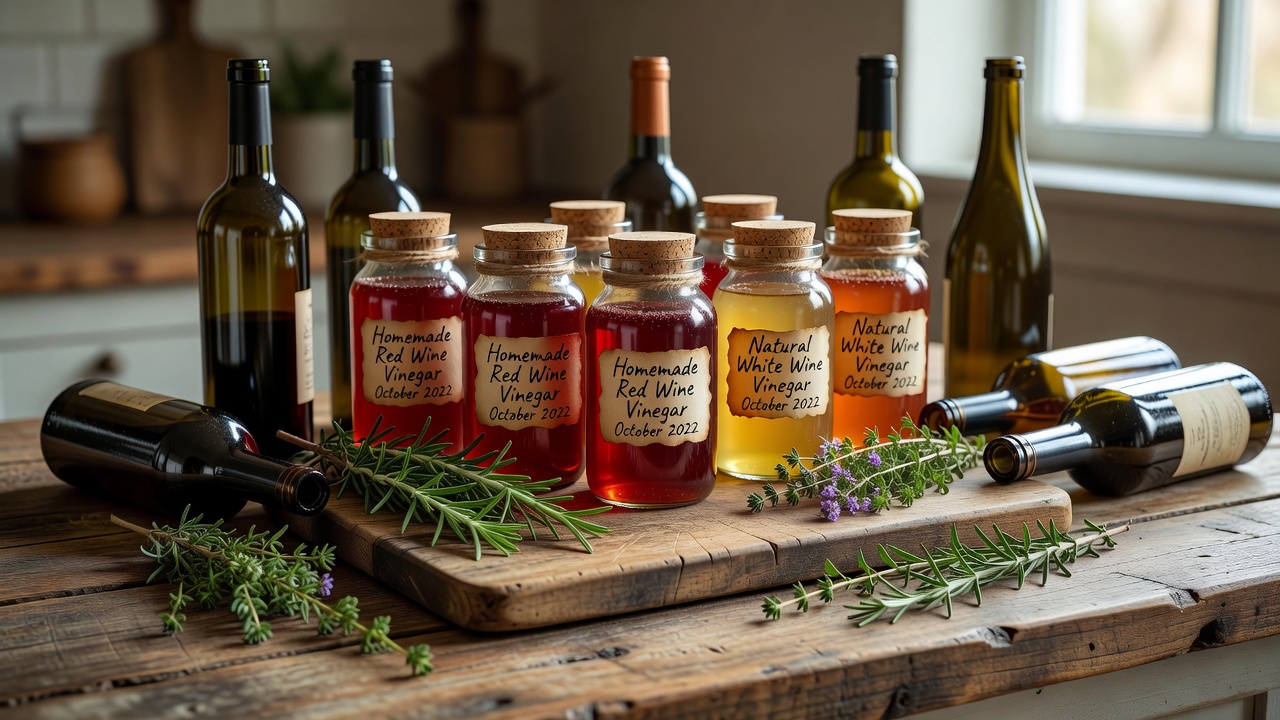
Transforming leftover bottles of natural wine into homemade vinegar is a sustainable practice that appeals to home cooks and enthusiasts alike. This process harnesses acetic acid fermentation to create a product far superior in flavor and complexity to many commercial options. By using low-intervention wines, you preserve the unique characteristics of the base while producing a versatile pantry staple that reduces waste and connects you to age-old preservation techniques. Whether you have half-empty bottles from dinner parties or a collection of natural wines from small producers, turning them into vinegar extends their life and unlocks new culinary possibilities. The result is a living condiment that can vary batch to batch, reflecting the terroir, grape variety, and fermentation nuances of your starting wine.
The Science of Acetic Acid Fermentation
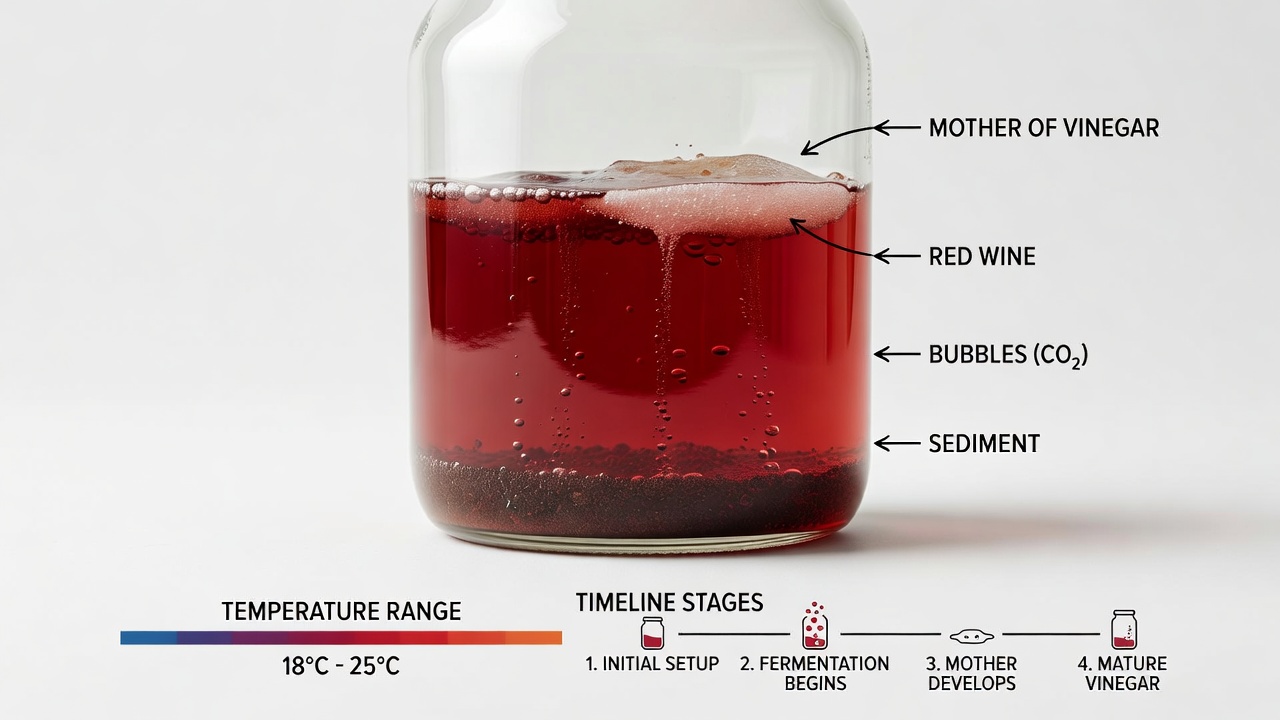
Acetic acid fermentation occurs when ethanol in wine is oxidized into acetic acid by bacteria, primarily Acetobacter species. This requires oxygen, which is why the process uses wide-mouthed jars covered with breathable cloth. Unlike commercial vinegars that often undergo pasteurization and filtration, natural versions retain live cultures for ongoing flavor development. The bacteria form a gelatinous layer known as the mother of vinegar, which can be reused in future batches to speed up the process. Temperature plays a critical role; the ideal range of 70-85°F promotes efficient conversion without encouraging unwanted microbes. pH levels naturally drop as acidity increases, creating an environment hostile to pathogens. FDA guidelines emphasize proper hygiene to prevent contamination during home fermentation. Organic or biodynamic wines yield superior results because they lack added sulfites that can inhibit bacterial activity. These bases allow wild yeasts and bacteria to thrive, resulting in vinegars with nuanced aromas and tastes that evolve over time.
Key Differences from Commercial Vinegars
Commercial vinegars are typically produced quickly under controlled conditions for consistency and shelf stability. In contrast, homemade natural wine vinegar develops over weeks or months, offering layered flavors that reflect the original wine's terroir. It avoids additives and maintains probiotic qualities beneficial for digestion and cooking. Many store-bought versions are diluted or flavored artificially, whereas your homemade batch can be tailored precisely to your taste preferences and dietary needs.
Equipment and Ingredients Needed
Gathering the right tools ensures success and safety. Use glass jars to avoid reactions with metal or plastic. Wide-mouth designs allow better oxygen exchange. Cover with cotton cloth or unbleached coffee filters secured by rubber bands to keep out fruit flies while permitting airflow. Non-reactive utensils like wooden spoons or silicone spatulas prevent off-flavors. A digital thermometer helps maintain optimal conditions, and pH strips or a meter confirm acidity reaches safe levels below 3.0. Select low-intervention natural wines without added sulfites; reds like Cabernet or Pinot Noir work well for bold results, while whites such as Chardonnay produce brighter profiles. A small amount of raw, unpasteurized vinegar with an active mother serves as an optional starter culture to accelerate fermentation.
Step-by-Step Process with Timelines and Temperature Controls
Begin by selecting a wine at room temperature and ensuring all equipment is thoroughly cleaned with hot water and allowed to air dry. Pour the wine into a clean jar, filling it only halfway to maximize surface area for oxygen. Add 10-20% starter vinegar if available. Secure the cloth cover and position the jar in a dark, draft-free spot where temperatures stay consistently between 70-85°F. Stir gently every two to three days with a wooden spoon to redistribute the developing mother and introduce fresh oxygen. Initial signs of activity include bubbling and a tangy aroma within the first week. The primary conversion phase lasts two to four weeks, after which taste testing begins. Full maturation for balanced flavor typically requires one to three additional months. If temperatures dip below 65°F, fermentation slows dramatically; above 90°F risks spoilage. Track progress weekly by noting acidity development and adjusting placement as seasons change.
Flavor Variations Using Herbs or Fruit
Once primary fermentation stabilizes, experiment with infusions for customized vinegars. Add fresh rosemary, thyme, or basil sprigs for herbaceous depth suitable for roasted vegetables. Citrus peels from organic oranges or lemons impart bright, zesty notes ideal for seafood dishes. Berries like raspberries or figs create fruit-forward versions perfect for desserts or glazes. Steep additions for seven to fourteen days in a secondary jar, then strain and bottle. Each variation transforms the base into something unique, allowing you to match vinegars to specific recipes or seasonal ingredients.
Troubleshooting Common Issues
Mold appearing on the surface requires immediate discarding and restarting with sanitized tools. A cloudy appearance with sediment is normal and indicates active cultures. If no acidity develops after four weeks, verify temperature consistency or introduce additional starter. Fruit flies can be deterred by tighter cloth seals. Off odors often resolve with continued aeration and time. Always discard batches showing pink or fuzzy growth beyond the mother layer.
Comparisons of Outcomes from Different Wine Styles
Red wines produce robust, earthy vinegars ideal for marinades and reductions. White wines yield lighter, fruitier results perfect for delicate dressings and pickling. Rosé creates delicate pink vinegars with floral undertones that shine in summer salads. Sparkling wines can yield effervescent finishes if monitored closely. Biodynamic and organic bases consistently outperform conventional wines in depth and complexity due to their living microbial profiles.
Short FAQ on Storage and Culinary Uses
How to store: Keep in sealed glass bottles in a cool, dark place for up to a year, with periodic tasting to monitor evolution.
Culinary uses: Use in vinaigrettes, deglazing pans, pickling vegetables, or as a finishing splash on soups and grains.
Is it safe? Yes, when pH is monitored and hygiene maintained, per WHO food safety principles. Additional guidance from CDC food safety resources supports home fermentation practices.
Can I scale the recipe? Yes, simply multiply jar sizes proportionally while maintaining the half-full oxygen ratio.
What if my mother sinks? This is normal; it will reform on the surface over time.
Conclusion
Making natural wine vinegar at home connects you to traditional preservation methods while reducing waste. Experiment with different wines and flavors to create custom batches that elevate your cooking and provide endless satisfaction from simple ingredients.
No comments yet. Be the first!